Remote Controlled Eight-Relay Board
PART II
- Using the RF12 Board by Jeelabs

SEE ALSO:
Eight-Relay Module: control the relays using a Blue-tooth smart-phone or tablet.
http://gampageek.blogspot.co.uk/2014/11/remote-arduino-controlled-eight-relay.html
Introduction
I
am making a remote control device. It allows me to independently switch
eight relays and control various items. When I press buttons on a
small keypad, instructions will be decoded and transmitted via a
microwave RF packet transceiver (@868 MHz). At the other end (up to 100m away!) another transceiver decodes the message and switches the relays ON or OFF.
I'm using a pair of RF12 modules (which uses the Si4420 RF chip) on boards by Jeelabs. They are small (4 x 2cm), inexpensive (£10 ea.) and easy to use:- libraries and code freely available for the Arduino.
Deepgeek link: http://en.wikipedia.org/wiki/Multiple_frequency-shift_keying
Deepgeek link: Si4420 RF chip datasheet
Deepgeek link: http://en.wikipedia.org/wiki/Multiple_frequency-shift_keying
Deepgeek link: Si4420 RF chip datasheet
Q. Why RF and not IR?
Ans. I want to use the RC device through walls and outside, so it's got to be RF - you get about 100m in line of sight, and @869 MHz you get penetration through walls.
Instructions typed on a small keypad will be transmitted via the first RF12 microwave RF packet transceiver. At the other end the second RF12 handles the packet and another Arduino switches the relays on the x8 relay board, ON or OFF.

How I'm knitting it: device visualisation
To avoid some of the pitfalls I fell into, I recommend you following the geekery recipe below.
Geekery Recipe: Using the RF12 board with Arduino Uno
As mentioned above, the RF12 boards are available from Jeelabs (£9.33). These enable data sharing among common network groupings. I am just using them for RC, although they are capable of much more. I am working at 5v so I need all the components for the board.
Assembling and connecting RF12 boards.

Useful links before starting:
Jeelabs article http://jeelabs.org/2011/02/02/meet-the-rfm12b-board/
Jeelabs hardware reference http://jeelabs.net/projects/hardware/wiki/RFM12B_Board
RF12 datasheet https://docs.google.com/open?id=0B0rsQRXKNaRMcDgydDNLa1ZLUkU
For a guide on soldering see this link: http://www.make-digital.com/make/vol01/?pg=166#pg166
1.
Start by soldering on the surface mount module. The way
I found best, was to lightly flux all the parts I'm going to solder (using a flux pen) and tin the SMD mounts on
the module. Then use a small croc-clip to hold the module in place on the board
and reheat the tinned contacts until solder flows. Then pull away the soldering
tip, allowing cooling. Be careful not to overheat the module – proceed slowly
to allow proper cooling.
2. Solder the rest of the components starting
with the smallest or lowest profile first. This order worked for me: small
capacitors, resistors, voltage regulator, electrolytic capacitor, and finally
the header strip.
3.
Note the PCB has the connecting Arduino pins marked on
it.
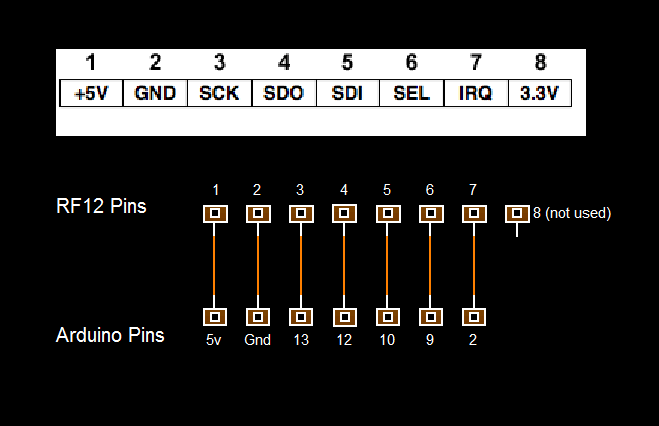
4. Connect the RF12 boards to the Arduinos according to the above diagram. At this point I have two RF12 Arduino transceivers all wired up.
I don’t pretend to understand how all this code and library works, but it works ok and that’s good enough for me, at least for now.
1. Download and install the RF12 Arduino library http://jeelabs.org/pub/snapshots/RF12.zip
2. Open the RF12 demo sketch.
Note I had to change the Baud rate of the serial connection to get it to work ie
Note I had to change the Baud rate of the serial connection to get it to work ie
void setup() {
Serial.begin(57600); CHANGE to Serial.begin(9600);
........ others may work too..........
Load the sketches to the Arduinos and refer to this page: http://jeelabs.org/2011/02/02/meet-the-rfm12b-board/. I got something that looks like this when I opened the serial monitor(s):
........ others may work too..........
Load the sketches to the Arduinos and refer to this page: http://jeelabs.org/2011/02/02/meet-the-rfm12b-board/. I got something that looks like this when I opened the serial monitor(s):

...plus some other stuff I didn’t need to worry about.
I set my RF12’s to 868 MHz working in group 10
and each node ID labelled in sequence 1, 2 etc... The RF12 demo stores these
data in memory so the nodes remember what the freq is and their ID’s.
It’s tricky keeping track of which nodes are on which serial COM and which Arduino. I am uploading to or sending / receiving serial data from at least two. Obviously the more Arduinos connected the worse it gets, so I label the Arduino with tape and write the COM number on it.
9. I typed this into the serial monitor for node 1:
8b
10g
1i
and this for node 2:
8b
10g
2i
10. For each node, I tried sending max-size packet with ack [acknowledge]
t
and in return I got in return something like this
for node 1, group 10:
Current
configuration:
A i1 g10 @ 868 MHz
> 0t
test 0
-> 66 b
OK 193
> 0t
test 0
-> 66 b
OK 193
and in return I got in return something like this for node 2, group 10:
B i2 g10 @ 868 MHz
> 0t
test 0
-> 66 b
OK 193
That tells me the nodes are successfully transmitting and receiving data-packets – huzzah!
It’s not absolutely necessary, but I could go
ahead and test further by playing with the packetbuf demo (remember to change baud rate
if you get a problem). I am using packetbuf code in my RC device.
TIPS:
To avoid some of the pitfalls and frustrations I got into, I recommend steps 2. through to 9. are followed if you use your Arduino or AVR chips for other things, because the memory may get overwritten. This happened to me on a few occasions. Also label which Arduino is using which COM connection. It will save lot’s of grief as the number of nodes increase, especially if you are loading different sketches to different Arduinos.
Beware of using delay() with RF12 modules. They use interrupts to operate, hence Arduino pin 2 is used, which is one of the external interrupt pins. Arduino delay() plays havoc with interrupts so it can't be used. Use blink-without-delay, which is given as an example with the Arduino IDE. Alternatively, I use delayMicroseconds() which does not interfere with the packet buffer code I am using. I think purists may prefer blink-without-delay, however.


